Analog Joystick Controller
Varenummer:
128-726
Varekode: ARDU0019
Vægt: 26 g
21 stk.
på lager
Details
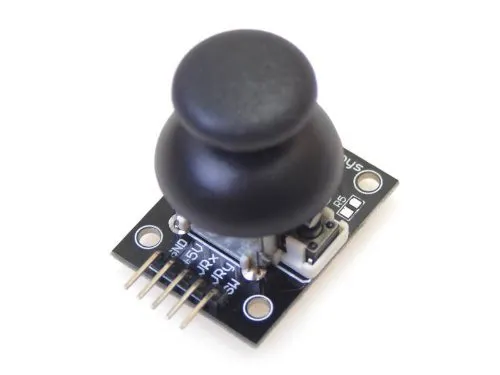
- PS2 style 2 axis directional joystick
- Pressing the joystick actuates a push button
- Compatible with Arduino interface
KY-023
| PINOUT | |
|---|---|
| PIN | DESCRIPTION |
| 1 | GND |
| 2 | +5V |
| 3 | X-Axis (analogue) |
| 4 | Y-Axis (analogue) |
| 5 | Push button (Connects to GND) |
EXAMPLE CODE
ARD_Analogue_Joystick_HCARDU0019_Example.pde
/* FILE:    ARD_Analogue_Joystick_HCARDU0019_Example.pde    DATE:    03/07/12    VERSION: 0.1
 This is a simple example of how to use the HobbyComponents Arduino analogue joystick module (HCARDU0019). The module has three outputs, two 5V analogue outputs  representing the position of the joysticks X/Y axis, and one switch contact output  representing the joystick’s push button. The switch contact has no pull-up and simply  connects the pin to ground when the button is pressed therefore a pull-up will be  required.
 This example program reads the status of the analogue and push button pins and  outputs the result to the serial port. to the UART.
 MODULE PINOUT:
 PIN 1: Ground PIN 2: +5V PIN 3: X-axis PIN 4: Y-axis PIN 5: Switch
 You may copy, alter and reuse this code in any way you like but please leave  reference to HobbyComponents.com in your comments if you redistribute this code. */


#define JOYS_VRX_DIO A0    /* Select the input pin for the joystick's X-Axis */
#define JOYS_VRY_DIO A1    /* Select the input pin for the joystick's Y-Axis */

#define JOYS_SW_DIO 2      /* Select the input pin for the joystick's push button */

 /* Initialise serial and DIO */ void setup()
{
  /* Setup the serial port for displaying the status of the sensor */
  Serial.begin(9600);

  /* Configure the DIO pin that the joystick's push button will be connected       to. As it has no pullup we will need to enable the Arduino's internal pull-up */
  pinMode(JOYS_SW_DIO, INPUT);
  digitalWrite(JOYS_SW_DIO, HIGH); // turn on pull-up resistors
}

 /* Main program loop */ void loop()
{
  /* Read the current position of the joystick's X & Y axis via the analogue pins */
  Serial.print("X axis: ");
  Serial.print(analogRead(JOYS_VRX_DIO));
  Serial.print(" Y axis: ");
  Serial.print(analogRead(JOYS_VRY_DIO));

  /* Read the state of the push button and if pressed, output the state to the       serial port */
  if (!digitalRead(JOYS_SW_DIO))
  {
    Serial.println(" Button pressed !");
  }else
  {
     Serial.println();
  }
}
Inkl. moms
Kr. 29,00
Kr. 59,00
- v/10 – Kr. 20,00
Analog Joystick Controller
128-726
/ ARDU0019
21 stk.
på lager
Details
- PS2 style 2 axis directional joystick
- Pressing the joystick actuates a push button
- Compatible with Arduino interface
KY-023
| PINOUT | |
|---|---|
| PIN | DESCRIPTION |
| 1 | GND |
| 2 | +5V |
| 3 | X-Axis (analogue) |
| 4 | Y-Axis (analogue) |
| 5 | Push button (Connects to GND) |
EXAMPLE CODE
ARD_Analogue_Joystick_HCARDU0019_Example.pde
/* FILE:    ARD_Analogue_Joystick_HCARDU0019_Example.pde    DATE:    03/07/12    VERSION: 0.1
 This is a simple example of how to use the HobbyComponents Arduino analogue joystick module (HCARDU0019). The module has three outputs, two 5V analogue outputs  representing the position of the joysticks X/Y axis, and one switch contact output  representing the joystick’s push button. The switch contact has no pull-up and simply  connects the pin to ground when the button is pressed therefore a pull-up will be  required.
 This example program reads the status of the analogue and push button pins and  outputs the result to the serial port. to the UART.
 MODULE PINOUT:
 PIN 1: Ground PIN 2: +5V PIN 3: X-axis PIN 4: Y-axis PIN 5: Switch
 You may copy, alter and reuse this code in any way you like but please leave  reference to HobbyComponents.com in your comments if you redistribute this code. */


#define JOYS_VRX_DIO A0    /* Select the input pin for the joystick's X-Axis */
#define JOYS_VRY_DIO A1    /* Select the input pin for the joystick's Y-Axis */

#define JOYS_SW_DIO 2      /* Select the input pin for the joystick's push button */

 /* Initialise serial and DIO */ void setup()
{
  /* Setup the serial port for displaying the status of the sensor */
  Serial.begin(9600);

  /* Configure the DIO pin that the joystick's push button will be connected       to. As it has no pullup we will need to enable the Arduino's internal pull-up */
  pinMode(JOYS_SW_DIO, INPUT);
  digitalWrite(JOYS_SW_DIO, HIGH); // turn on pull-up resistors
}

 /* Main program loop */ void loop()
{
  /* Read the current position of the joystick's X & Y axis via the analogue pins */
  Serial.print("X axis: ");
  Serial.print(analogRead(JOYS_VRX_DIO));
  Serial.print(" Y axis: ");
  Serial.print(analogRead(JOYS_VRY_DIO));

  /* Read the state of the push button and if pressed, output the state to the       serial port */
  if (!digitalRead(JOYS_SW_DIO))
  {
    Serial.println(" Button pressed !");
  }else
  {
     Serial.println();
  }
}